Lactate Testing – What to do and how to use the Results
I don’t know if it’s just my Twitter feed, but the amount of talk about lactate testing and lactate-based training seems to have increased a lot in recent months.
As a strong believer in large amounts of Z1 training (3 zone model), I am used to being disciplined with my intensity; I love my Z1 rides!! However, I also love intervals!! I love working hard; I love the feeling you get while fighting to keep the power/intensity where you want it as the fatigue starts to bite.
However, having used HR zones based on information from Stephen Seiler very successfully, a pretty nasty bout of Covid seemed to shift my zones A LOT!! Suddenly I had to train with a very low HR to get the desired RPE.
I’d actually had my suspicions that my Z1 HR was a little too high and had started lowering my Z1 ride intensity for a few months before Covid…however, post-Covid, it was time to test.
How to Complete a Lactate Test
Having done a Sports Science degree, I was pretty familiar with the basics (I actually did my dissertation on lactate testing for rowers).
The likelihood is that you will go somewhere to get yourself tested, so you don’t need to worry too much about equipment and things, but all that is needed includes:
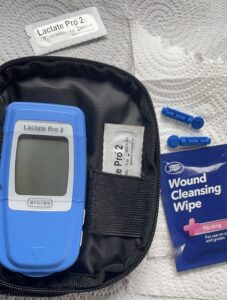
- Lactate Measuring Device
- Lactate Test Strips
- Lancets and Finger Prick Device
- Alcohol Wipes
- Rubber Gloves
- Clean gauze
When it comes to recording the results, it can all be done post-test. The lactate meter will store the results, and the HR can be looked at from the ride file.
What Protocol Should You Use?
Though if you go to a lab/coach to get yourself tested they will likely have a protocol they use, it’s worth discussing the protocol as the step length really does matter.
Step Length
This really does matter! It’s not uncommon to see 3-minute steps; however, for lactate testing, this is likely to be a bit short. It’s possible with steps this short that you won’t quite have reached a ‘steady state’, and so results may look better than they really are, and your zones will be set too high…this is a disaster for your training, as we all know if we’ve set our FTP too high…IT IS BAD!!
Personally, if someone else is doing the testing, I think 5 minutes is not a bad step length. You should be pretty steady at each power by 5 minutes and it means you can still do quite a lot of steps to get a good spread of results.
If you are testing yourself, I’d go slightly longer. It just gives you a bit of extra time to sort things out and takes the pressure off.
P.S. If you are testing yourself, you need to be very organised and have a good system to make sure you get good data.
Ramp Rate
The next thing to think about is where you start the test and how big the steps are. You can judge the starting point if you know the rider. You want a good 3-4 steps before LT1 if you can no one will get too fatigued from riding an extra low-intensity step! For example, I started at 100 Watts and got 5 tests done before LT1.
The ramp rate I use is 20 watts. It’s close enough that you shouldn’t miss anything and far enough apart that you will be working hard soon enough and fatigue from the length of the overall test isn’t a factor.
Testing
Like I said above, you want a good routine so you can test quickly and get a good clean sample for the best results. Here’s what I do:
- Insert the test strip into the machine
- Clean the area with the alcohol wipe
- Prick the finger/earlobe (I use a finger)
- Wipe away the first drop with the gauze
- Take the sample from the send drop
- Use the gauze to stop the bleeding
What do you do with the Results?
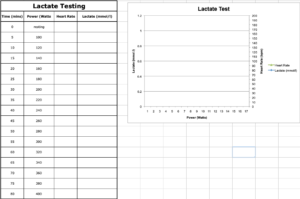
This, like anything, is the most important thing! If you don’t make the most of the results, you won’t get to take advantage of the gains. First, you need to get the data collected. Below is just the raw HR and Lactate data from my post-covid test (about 6 weeks after covid). It’s a simple excel with the graph to plot the data. If you are good, you can interpret the results from this, or you can have some help from software…though I always do both.
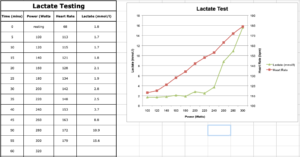
The software used for the chart below gives you the results of your test with all possible different ‘thresholds’ using all the different ways of establishing them. This was done using exphyslab.com; it’s a pretty useful tool.
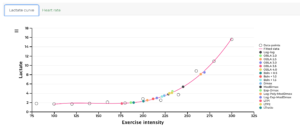
Once you have your thresholds, you can use them in training. I find it all fairly interesting, though, for my training, I’m mainly interested in LT1 and LT2. From this second graph, it put LT1 at 175 Watts and LT2 at 230 Watts. This is pretty low for me; the week before I got Covid, I did 315 Watts for 21 minutes in a hilly TT. But this is now and it’s todays training that counts.
My Plan
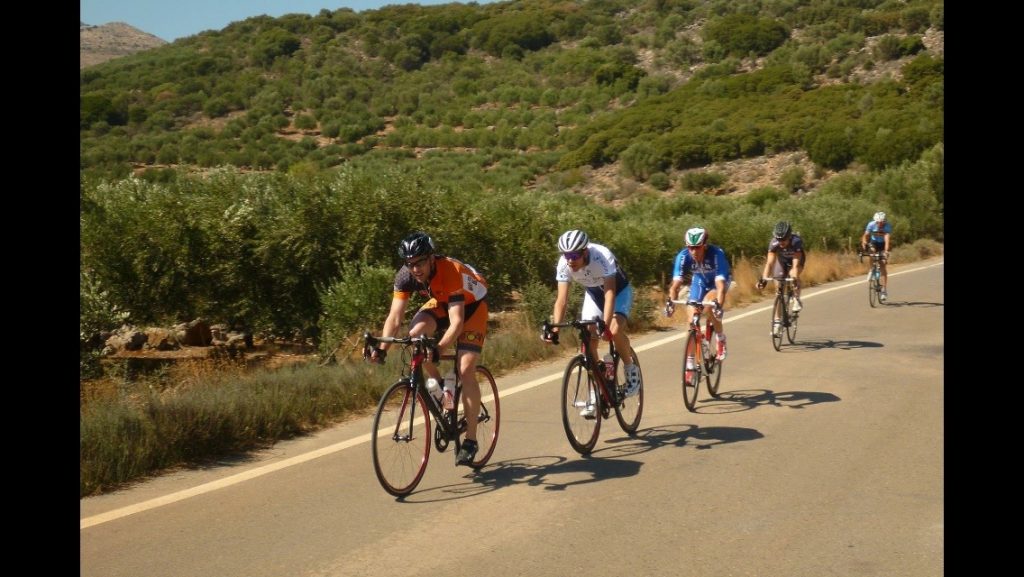
As with my training philosophy, I will be doing a block of predominantly Z1 training, keeping rides well under 175 the whole time. Then once or twice a week I will do some sweet spot intervals at around 210-215 watts and a tiny bit of Z3, just to re-introduce it (I’ve avoided Z3 so far since Covid). I’m in Greece for 4 weeks, so this will be the length of the block, and I’ll re-test once I’m back home.
As I write this, I’m in week 2 of the block; week one went well; here’s the HR distribution:
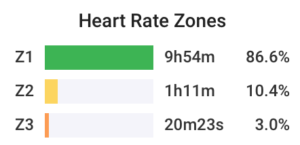
I’ll update after the next test and lets see how things have moved on.
If you have any questions, feel free to get in touch: coach@summitcyclecoaching.co.uk