5 Ways to Make Aero Gains
The cat is very much out of the bag when it comes to aero. When I first started testing my own aero, there were still plenty of people that didn’t believe it made a difference or didn’t think it was worth the time or money.
It only needs a quick glance at the efforts individuals, teams, and manufacturers go to maximise aero gains to know how important it is!!
For this, I’m assuming someone who’s kitted out with the appropriate bike, wheels and kit who’s looking for the best ways to get faster without massive changes like bike/wheels.
Here are 5 quick ways to make aero gains.
1. Optimise your Clothing
Though clothing is getting more and more expensive, it is probably still one of the most cost-effective ways to get faster. Shoe covers and socks would be near the top of my list if I was starting again. And after that, it would be lots of research into the fastest skinsuit for my needs.
Skin suits have come on more than just about anything else since I started time trialing. You need to look at options that will suit you relative to the conditions you will ride in and the speeds you will ride at. The ‘fastest’ suit you can buy (as advertised) may not be the fastest suit for you. If the suit is optimised for people who ride at 30+ mph, and you ride more like 25 mph, then you need to look at suits optimised for that speed.
Aero gloves may or may not be faster…you’ll have to test that one!
2. Learn to ‘Turtle’ your Head and Shoulders
Before we start on this one…I’m a massive believer in seeing where you are going, so you need a position that allows you to see up the road and be safe.
Head position is one of the biggest things you can change to make gains. ‘Turtling’, as it’s called, is a way of dipping your head and shrugging your shoulders to minimise their exposure to the wind.
There’s a bit of an art to it, and it does take practice to be able to hold a good position for a long time.
The way I found that works best is to do the actions in a specific order. First, pull your chin down towards your forearms and then shrug your shoulders while gently pulling on the aerobars. If you do it the other way around, your head/neck, has restricted movement, so it doesn’t work as well.
Good to get a mirror to practise in, it helps more than you’d think.
Though I do think the gains from this are quite big, it’s still the icing on the cake. You need to get the fundamentals of your position right first, then add this on top.

3. Mobility Work
Whether you do specific work through range of motion (ROM) or you use strength exercises that challenge ROM, it’s well worth the time invested.
I deliberately didn’t say stretching because that’s a bit of a broad term and the image most people have is of ‘static stretching’ and I’m not a fan!!
Mobility to me means being able to go through the desired ROM with control and involves active muscles.
The obvious candidate for someone trying to get into a TT position is hip flexion mobility, with thoracic mobility a close second. It’s a big topic, so can’t go into a lot of detail, but if you lack the required mobility for your position, you are likely to compensate elsewhere, possibly increasing your chance of injury and definitely making it difficult to maintain your position.
For more on this, there’s a post on Hip Mobility here.
4. Hydration Placement
This is massive! Especially given that longer events need more hydration volume and the aero gains being made over an even longer period.
The costs in this are relatively small, but the gains can be pretty big. For example, testing at 25mph by aero-coach.co.uk found that there’s around a 4 Watt difference between a standard 500ml bottle and an aero bottle on the downtube. However, if you put the standard bottle behind your seat, it’s a slight improvement on an aero bottle.
Building on that, for those who watched the sub-7 triathlon project, you’ll have noticed Joe Skippers’ team having essentially dummy aero bottles behind the seat, as it was faster with them than without!! Though I’ve not seen any data on that, since Dan Bigham was leading the tech side of that particular project you can be very confident it was tested and tested well!!
Between-the-arm hydration systems tend to perform well in testing, slightly slower, though very similar to behind-the-seat systems.
5. Spending Time!!
THIS IS THE MOST IMPORTANT ONE!!
I saved the best ’til last.
This is not just the most important, it’s also the one that ties the rest of them together. For example, though testing has shown the differences between hydration systems, what about on YOUR BIKE, with YOUR position?? You don’t know until you test.
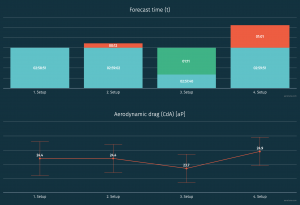
I learned a long time ago how important this was and learned how to test using the Chung Method. I tested at an outdoor velodrome, repeating standardised protocols and then analysing using Golden Cheetah’s Aerolab feature (see ‘DIY Aero Testing‘ post for more details).
This one probably goes a bit against the title of ‘quick…but truly, testing is the only way to know what works for you. And once you know how to do it you can test anything…to a point. If the difference is so small it’s within your margin of error, you need to look at other things…like cost, comfort, etc, to make the decision. But particularly for improving your position on the bike, it works extremely well…and will be the biggest gains you will make.